Simple Home Renovations – Part 1
June 4th, 2015
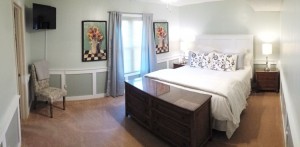
Simple Home Renovations – Part I
Recessed Panel Wainscot – “shaker style”.
This is a simple project that adds style and appeal to any room. All you need is Birch plywood, paint, paint brush, painters tape, sandpaper, tape measure, wood filler and your labor to complete this project.
Supplies:
- ¾” Birch plywood (2-3 sheets)
- ½” Birch plywood (1 sheet)
- Quart of Paint
- Finishing Nails or Pneumatic Finish Nail Gun
- Medium Grit Sandpaper
- Wood filler
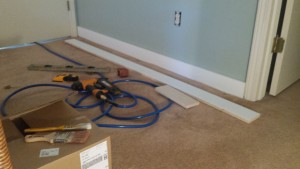
Remove any existing baseboards or shoe molding.
Begin by ripping the ¾” Birch plywood panel into 3.5” widths that are 8’ in length. From these, we create the baseboard, the top rail and the vertical stiles.
Rip the ½” Birch plywood into 1.5” widths that are 8’ in length. This creates the top rail cap.
It is now time to find the “studs” in your wall. Purchase a battery powered “stud” finder at your local hardware or building supply store. Prices range from $25 – $75. Using painters tape; mark each stud with the tape on the wall approximately 36” up from the floor. You will need to be able to see the tape as you are attaching your vertical stiles.
The height of wainscot is generally determined by the ceiling height in the room(s) you choose, but you can make it any height you desire. For this project, the ceilings were 8’, so we chose a wainscot height of 32” or 1/3 of the wall height.
Now decide how often you would like to have a vertical stile. For this project, we chose to have one every 32” or every other wall stud in order to create horizontal rectangles in our wainscot. If you choose to place one every 16”, then you create vertical rectangles for your wainscot. Determine your width, then count how many stiles you will need to complete your room. To determine your stile length, take your overall wainscot height and subtract the top rail thickness of ½”, the top rail width of 3.5” and the baseboard rail width of 3.5”. For our project, the length of our stiles is 24.5”. Once complete, we will have a 32” wainscot height.
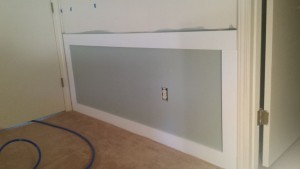
Start in one corner of the room by placing and attaching the baseboard rails. Use a level during this step to ensure each section lines up properly. Attach with finishing nails to the actual wall studs. If you like, you could also use a construction adhesive in conjunction with nails. Note, you will most likely have to trim these rails to fit you wall lengths. You can choose to “butt” these rails together where they meet or cut them on a 45 degree angle so they overlap which creates a more seamless look.
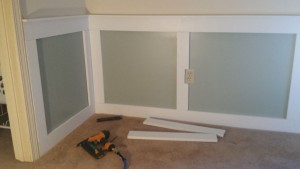
Draw a line 32” up the wall from the bottom of your installed baseboard rails. Do this every 5-6 feet so you have a reference point for your next installation step. Next install the vertical stiles. Once again, start in a corner. Place your 1st stile in the corner and attach with finishing nails to the stud. Construction adhesive can be used in conjunction if you like. Index down the wall and place your next stiles based on the repeat you chose. Center the 3.5” wide stile over the stud before you attach. Once you have progressed 8’, attach the top rail to this section of wainscot in the same manner as the baseboard rails. Continue around the room. You may have to cut some of your stiles to accept electrical outlet covers. Do so with a jigsaw as needed.
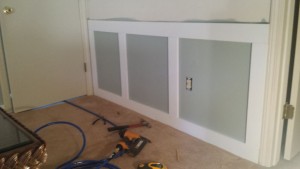
Once complete, it is now time to install the top rail cap. Start in the corner of the room and lay these 8’ lengths down on top of the top rail horizontally. This will create a “shadow” affect for the wainscot. Attach with nails to the top rail. Once again, a construction adhesive can be used. Butt the joints together or use a 45 degree overlap cut for a seamless look. At the room corners, the same adjoining methods can be used.
Once complete, paint your wainscot a contrasting color to your walls to really make this project “pop”. For our project, we chose a 2-tone color affect for this room. We painted the bottom section of the wall prior to installing our Recessed Panel Wainscot.
Depending on your flooring, you may want to add a shoe mould. If so, that would be installed last and painted accordingly.
Join us next week for Part II of our Simple Home Renovations segment.