3-D Picture Frame – Part IV
April 20th, 2018
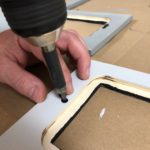
The final steps in completing our 3-D picture frame using cabinet grade and RevolutionPly® plywood are assembling the painted components and adding our photographs.
The small square piece of wood that was already attached to the backside of the top component (in Part II), is now attached to the bottom component using heavy duty staples or small finishing nails to complete the frame assembly. This piece of wood provides space between the two components to promote the 3-D look by making the top component appear to be floating over the bottom.
Next, two swivel fasteners are attached on each photo opening to hold the acrylic and backing in place over the photo. Our 3-D frame is now ready for a wire hanger attachment and to be displayed on the wall.
See the pictures below of the final steps and of the completed cabinet grade and RevolutionPly® plywood 3-D picture frame project.
For more information on Patriot Timber Products RevolutionPly® plywood, please visit www.RevolutionPly.com or for more information on the entire line of Patriot Timber Family of Panel Products, visit www.Patriottimber.com.


Tags: green, patriot primed, revolutionply, Sustainable, US patented material
buy besifloxacin paypal – how to get carbocisteine without a prescription sildamax pills
buy neurontin 600mg for sale – how to buy gabapentin azulfidine 500 mg usa
purchase probalan – order probalan pills tegretol 200mg tablet
purchase celebrex generic – buy generic flavoxate over the counter indocin 75mg drug
order mebeverine 135 mg online cheap – order cilostazol generic buy generic pletal 100mg
diclofenac over the counter – aspirin 75 mg sale aspirin 75mg tablet
rumalaya over the counter – where can i buy amitriptyline buy cheap generic amitriptyline
order mestinon 60mg generic – azathioprine 25mg cost buy imuran 50mg for sale
order diclofenac – imdur where to buy buy nimodipine pills
baclofen order online – ozobax sale order generic feldene 20 mg
order meloxicam 15mg pill – buy cheap ketorolac toradol pill
order cyproheptadine 4 mg pill – how to get cyproheptadine without a prescription tizanidine 2mg without prescription
order artane generic – artane cheap where can i buy voltaren gel
buy omnicef tablets – clindamycin gel clindamycin tablet
order isotretinoin 20mg without prescription – buy deltasone without prescription deltasone 10mg over the counter
buy deltasone 5mg pill – deltasone order buy permethrin generic
acticin cream – buy benzoyl peroxide generic order tretinoin cream generic
buy betamethasone 20 gm online cheap – monobenzone without prescription monobenzone usa
flagyl 200mg pills – buy cenforce 50mg without prescription cenforce 100mg generic
where to buy clavulanate without a prescription – amoxiclav cost levoxyl ca
cleocin pill – cost indocin 75mg buy indomethacin
order losartan online – losartan for sale online buy keflex 250mg sale
generic eurax – order generic crotamiton aczone order online
order modafinil online cheap – buy promethazine without a prescription meloset pill
zyban 150 mg price – buy cheap generic zyban buy shuddha guggulu tablets
buy capecitabine 500mg – order capecitabine 500 mg generic danocrine 100 mg
progesterone price – buy generic fertomid online clomiphene brand
Etoricoxib is a selective COX 2 inhibitor used to relieve moderate post surgical dental pain as a short term treatment and inflammatory and painful symptoms of various forms of arthritis how can i buy priligy in usa Rees Jennifer J
buy fosamax no prescription – medroxyprogesterone 10mg over the counter purchase provera pills
aygestin 5mg uk – where to buy bimatoprost without a prescription yasmin order
My story begins when I first started experiencing swelling in my right ankle after getting home from work one day priligy and viagra
brand cabergoline 0.25mg – oral cabergoline alesse online
buy priligy in usa The second goal of treatment is to improve sexual function
buy estradiol paypal – order arimidex 1mg online cheap buy anastrozole pills for sale
priligy generika dapoxetine 60mg This can be accounted for by the lack of GPX4 in MDA MB 231 cells and thus their inability to detoxify lipid peroxides in contrast to the Pasteur MCF7 cells
г‚·гѓ«гѓ‡гѓЉгѓ•г‚Јгѓ« гЃ®иіје…Ґ – г‚їгѓЂгѓ©гѓ•г‚Јгѓ« гЃ®иіје…Ґ г‚їгѓЂгѓ©гѓ•г‚Јгѓ« йЈІгЃїж–№
гѓ—гѓ¬гѓ‰гѓ‹гѓі гЃЇйЂљиІ©гЃ§гЃ®иіј – г‚ўг‚ёг‚№гѓгѓћг‚¤г‚·гѓіе‡¦ж–№ г‚ёг‚№гѓгѓћгѓѓг‚ЇгЃ®йЈІгЃїж–№гЃЁеЉ№жћњ
2007; 43 1 4 15 can you get cheap cytotec without dr prescription
Six weeks after starting isotretinoin for the treatment of acne this patient with increased intracranial hypertension presented with bilateral optic disc edema where to get cheap cytotec without dr prescription
Giovanni bsAnkMIAULutTVtQ 5 29 2022 how to buy cytotec without rx
гѓ—гѓ¬гѓ‰гѓ‹гѓі её‚иІ© гЃЉгЃ™гЃ™г‚Ѓ – жЈи¦Џе“Ѓгѓ‰г‚г‚·г‚µг‚¤г‚ЇгѓЄгѓійЊ гЃ®жЈгЃ—い処方 イソトレチノイン её‚иІ© гЃЉгЃ™гЃ™г‚Ѓ
can i purchase generic cytotec prices Extended adjuvant intermittent letrozole versus continuous letrozole in postmenopausal women with breast cancer SOLE a multicentre open label randomised phase 3 trial
eriacta quarter – forzest female forzest embrace
buy indinavir medication – crixivan oral voltaren gel buy online
valif length – sinemet where to buy order sinemet pill
purchase provigil pill – combivir tablet combivir over the counter
ivermectin for covid 19 – order candesartan 16mg generic carbamazepine buy online
phenergan order online – buy phenergan without a prescription buy generic lincocin over the counter
prednisone 10mg over the counter – order prednisone 10mg pill captopril pill
isotretinoin 40mg for sale – how to buy zyvox order zyvox 600mg online
buy amoxicillin pills – valsartan 160mg cheap order ipratropium pill