Installation Recommendations for RevBead® Reversible Plywood Beadboard and PatriotBead™ Plywood Beadboard
October 17th, 2016
Panel Preparation:
- Care should be taken during handling and storage of panels in order to prevent damage to shiplap edges, face, or back.
- Acclimate in the installation environment for a minimum of 48 hours. Do not expose panels to direct weather or sunlight during the acclimation period.
- In order to minimize dimensional panel movement (shrinkage, swelling, warp, or bow), panels should be stacked flat on a level surface with ample spacing between sheets for proper support and air flow. Use at least 3 or 4 spacers at even intervals.
-
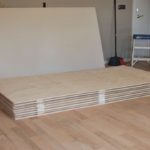
- Panel Acclimation
-
- Examine each panel using the Flex & Look Test.
- Follow these steps:
- Stand each sheet of beadboard vertically with its 4’ edge on the floor with the panel towards you.
- Grip the top panel edge with your right hand and firmly place your left palm against the face of the panel.
- Pull down with your right hand approximately 3” while simultaneously pressing forward with your left palm approximately 3”. Hold this position during inspection.
- With the panel in this flex position, thoroughly inspect the entire panel surface for irregularities, which will look like “bubbles” or “creases.” In the rare instance that you find such an irregularity, do not use the panel. Set it aside and contact Patriot Timber Products immediately for a resolution.
- Measure your wall or ceiling surface to determine where panels will need to be cut both horizontally and vertically in order for panel edges to align with a backing that can hold fasteners (studs, furring strips, blocking, wood substrate, etc).
*Drywall is not a suitable backing and will not hold fasteners
- When preparing to cut panels for installation, be sure to use the correct blade (cross-cut, rip, or combination blade) so that your cut edges are smooth and splinter free. Sand edges as needed.
- Measure and mark the backside of each panel for door, window, electrical outlet, and heat register cut-outs as needed. Double check your measurements before cutting (measure twice, cut once!). Make all of your cuts on the backside of the panel.
Panel Fitting & Installation for wall paneling/wainscoting applications:
- Make the necessary cut-outs for doors, windows, electrical outlets, heat registers, etc.
- Begin your installation by loosely fitting the panel into the starting corner leaving a ¼” expansion gap at the top and bottom of the wall and an 1/8” expansion gap around all cut-outs. Mouldings and/or outlet covers will conceal all expansion gaps.
- The leading panel edge must correctly align with the center line of the stud or furring strip to ensure all subsequent panels line up correctly during the balance of the installation.
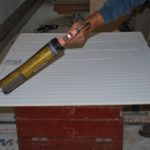
- Construction adhesive may be used in conjunction with fasteners to properly secure the panels. See Figure 2.
- Panels should be fastened 6” on center at ends and edges and 12” on center on studs and furring strips in the panel field. Only fasten through the bottom ship-lap edge that is flush with the wall. Do not fasten through the overlapping ship-lap edge of the next panel being installed. Continue this method with all panels being installed.
- Allow for expansion between panels by lightly butting or leaving approximately a 1/32” gap for interior applications or 1/8” for exterior weather protected applications.
- Use a minimum 2” finishing or ring-shank paneling nail (6d) for interior applications.
- Slightly counter-sink fasteners with hammer and nail set or adjust the depth of drive on your pneumatic nail gun. Be careful not to damage the surface of the panel with your preferred method of fastening.
- To complete your installation, install mouldings and use putty or wood patch to fill fastener holes. Paint or stain as desired.
-
-
- Panel Installation
Panel Fitting & Installation for ceiling applications:- Make the necessary cut-outs for ceiling fixtures such as lights, fans, etc.
- Begin your installation by loosely fitting the panel into the starting corner leaving a ¼” expansion gap where the walls meet the ceiling and an 1/8” expansion gap around all cut-outs.
- The leading panel edge must correctly align with the center line of the trusses/rafters/joists to ensure all subsequent panels line up correctly during the balance of the installation.
- Some amount of blocking will be needed to securely and properly attach the beadboard to your trusses/rafters/joists. Blocking should be placed between trusses/rafters/joists as needed for subsequent fastening.
- Panels should be fastened 6” on center at ends and edges and 12” on center on trusses/rafters/joists in the panel field. Only fasten through the bottom ship-lap edge that is flush with the ceiling. Do not fasten through the overlapping ship-lap edge of the next panel being installed. Continue this method with all panels being installed.
- Allow for expansion between panels by lightly butting or leaving approximately a 1/32” gap for interior applications or 1/8” for exterior weather protected applications.
- Use a minimum 2” galvanized casing nail (6d) for exterior ceiling applications or a minimum 2” finishing or ring-shank paneling nail (6d) for interior ceiling applications.
- Slightly counter-sink fasteners with hammer and nail set or adjust the depth of drive on your pneumatic nail gun. Be careful not to damage the surface of your panel with your preferred method of fastening.
- To complete your installation, install mouldings or trim and use putty or wood patch to fill fastener holes. Paint or stain as desired.
*For weather protected ceiling applications (such as porch ceilings or soffits), a vapor barrier should be placed between the panel and the studs, furring strips, wood substrate, etc.
**Installation requirements can vary from jobsite to jobsite. These are our recommendations for installing RevBead® and PatriotBead™. Our warranty only covers panel failure due to delamination.
-
Tags: patriotbead, RevBead, Sustainable