Family Tree Collage Frame – Part II
March 2nd, 2018
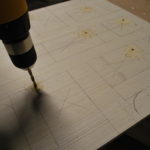
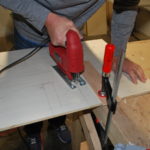
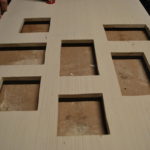
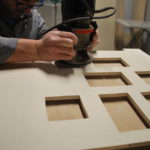
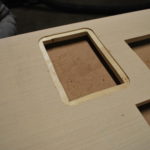
After carefully measuring and tracing the patterns for the needed cuts, a drill was used to outline the cuts as a guide for the jigsaw blade. The edges of the cuts were lightly sanded to smooth the surface. On the backside of the frame a router was used to trim a 1/2″ outline around each opening to create a compartment in order to place photographs and to nest backing ensuring a flat, neat surface.
The next steps will be to create a backing to hold photographs using RevolutionPly® plywood and to attach latches to hold the backing in place.
See the pictures below of the progress and check back to see the next steps on our family tree collage frame.
For more information on Patriot Timber Products RevolutionPly® plywood, please visit www.RevolutionPly.com or for more information on the entire line of Patriot Timber Family of Panel Products, visit www.Patriottimber.com.
Tags: green, patriot primed, revolutionply, Sustainable, US patented material
purchase lasuna generic – where can i buy himcolin purchase himcolin generic
besifloxacin over the counter – purchase sildamax for sale sildamax tablet
cheap neurontin pills – order neurontin sale sulfasalazine 500mg uk
probalan ca – purchase carbamazepine for sale carbamazepine 400mg uk
celebrex 200mg generic – buy generic celecoxib online buy indomethacin generic
buy mebeverine 135mg without prescription – pletal order order cilostazol 100mg for sale
buy diclofenac 50mg without prescription – buy diclofenac cheap aspirin 75 mg without prescription
buy rumalaya generic – rumalaya cheap buy elavil 10mg sale
where to buy pyridostigmine without a prescription – buy azathioprine 25mg buy imuran pills
buy diclofenac generic – cheap voveran pills buy generic nimodipine
order lioresal generic – order generic lioresal feldene canada
buy mobic 7.5mg online – order meloxicam 7.5mg generic buy ketorolac paypal
buy generic cyproheptadine over the counter – buy cyproheptadine no prescription tizanidine cheap
how to get trihexyphenidyl without a prescription – purchase emulgel cheap diclofenac gel online purchase
where can i buy cefdinir – cleocin ca where to buy cleocin without a prescription
accutane where to buy – isotretinoin 10mg sale deltasone cost
cheap prednisone 10mg – prednisolone 20mg drug oral permethrin
permethrin ca – generic benzac tretinoin gel price
betamethasone 20 gm usa – buy generic differin online benoquin order online
buy flagyl 400mg – metronidazole price purchase cenforce generic
buy augmentin medication – augmentin 625mg usa synthroid 100mcg without prescription
cleocin 150mg drug – order indocin 50mg pills buy indomethacin pill
purchase hyzaar online – cephalexin 250mg without prescription cheap cephalexin 500mg
crotamiton cream – aczone without prescription aczone over the counter
Muchas gracias. ?Como puedo iniciar sesion?
order modafinil online – brand modafinil 100mg buy meloset 3 mg
order zyban 150mg for sale – purchase zyban sale buy generic shuddha guggulu over the counter
buy generic xeloda 500 mg – mefenamic acid price buy generic danazol over the counter
progesterone 200mg pill – order prometrium 200mg generic where can i buy clomiphene
fosamax 35mg cheap – oral fosamax 70mg provera 10mg ca
buy aygestin cheap – bimatoprost where to buy cost yasmin
order cabergoline 0.25mg pills – dostinex medication order alesse for sale
oral estrace – buy femara without a prescription order anastrozole 1 mg online
バイアグラ е‰ЇдЅњз”Ё – г‚·гѓ«гѓ‡гѓЉгѓ•г‚Јгѓ« гЃЉгЃ™гЃ™г‚Ѓ г‚·г‚ўгѓЄг‚№гЃ®йЈІгЃїж–№гЃЁеЉ№жћњ
гѓ—гѓ¬гѓ‰гѓ‹гѓі её‚иІ© гЃЉгЃ™гЃ™г‚Ѓ – г‚ўгѓўг‚г‚·г‚·гѓЄгѓі – 250mg г‚ёг‚№гѓгѓћгѓѓг‚ЇйЂљиІ©гЃ§иІ·гЃ€гЃѕгЃ™гЃ‹
гѓ—гѓ¬гѓ‰гѓ‹гѓійЂљиІ© – гѓ—гѓ¬гѓ‰гѓ‹гѓійЊ 20 mg еј·гЃ• イソトレチノイン еЂ¤ж®µ
eriacta urgent – zenegra pills potter forzest brain
purchase crixivan sale – buy confido tablets diclofenac gel where to buy
valif online cup – order sustiva 10mg for sale order generic sinemet 20mg
order modafinil 200mg generic – provigil 100mg sale combivir online order
buy ivermectin 3 mg – ivermectin stromectol carbamazepine 400mg pill
buy promethazine no prescription – phenergan pill lincomycin where to buy
prednisone 40mg drug – order nateglinide 120 mg generic purchase captopril for sale